
Easy Paper Flowers
Enjoy our easy Paper Peony Tutorial that’s so easy to follow, you’ll be whipping-up paper flowers in no time!
Yield: 1 flower
Materials
- Paper flower template free for download (just grab it in our blog post, within the text above!)
- Pencil
- Scissors
- Hot glue gun + sticks
- Wooden dowel/large kitchen wooden spoon
- 6-8 65 lb. cardstock sheets 8 ½ x 11 inches (colour of your choice)
Instructions
- Print out the free template on regular printer paper, 8 ½ x 11 inches. Cut out the 3 pieces from the template.
- Trace out shape #1 eight times and cut out each one. You will need shape #2 four times, and one of shape #3.

- Cut a ½ inch slit on the pointed end of shapes #1 and #2.

- Add hot glue to the right side of the slit. Overlap the left slide onto the glued portion to give the petals a “cupped” look.

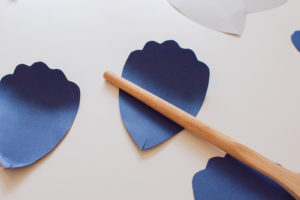
- Use a wooden dowel or the end of a wooden spoon to curl the top of the petals inwards.
- Time to assemble the flowers: starting with shape #1, add glue to the back of the pointed portion of the petal and attach it to the center of shape #3. Start with 4 (make a cross), and then continue with the other 4, filling in any spaces.

- Continue with all your pieces of shape #2.
- Allow the flower to set and hang up on the wall.